This chapter shows how to use the Fast Light User-Interface Designer ("FLUID") to create your GUIs.
Subchapters:
- What is FLUID?
- Running FLUID Under UNIX
- Running FLUID Under Microsoft Windows
- Compiling .fl files
- A Short Tutorial
- FLUID Reference
- Internationalization with FLUID
- Known limitations
What is FLUID?
The Fast Light User Interface Designer, or FLUID, is a graphical editor that is used to produce FLTK source code. FLUID edits and saves its state in .fl files. These files are text, and you can (with care) edit them in a text editor, perhaps to get some special effects.
FLUID can "compile" the .fl file into a .cxx and a .h file. The .cxx file defines all the objects from the .fl file and the .h file declares all the global ones. FLUID also supports localization (Internationalization) of label strings using message files and the GNU gettext or POSIX catgets interfaces.
A simple program can be made by putting all your code (including a main() function) into the .fl file and thus making the .cxx file a single source file to compile. Most programs are more complex than this, so you write other .cxx files that call the FLUID functions. These .cxx files must #include the .h file or they can #include the .cxx file so it still appears to be a single source file.
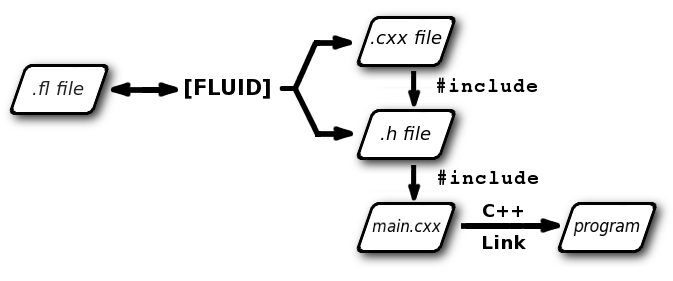
Normally the FLUID file defines one or more functions or classes which output C++ code. Each function defines one or more FLTK windows, and all the widgets that go inside those windows.
Widgets created by FLUID are either "named", "complex named" or "unnamed". A named widget has a legal C++ variable identifier as its name (i.e. only alphanumeric and underscore). In this case FLUID defines a global variable or class member that will point at the widget after the function defining it is called. A complex named object has punctuation such as '.' or '->' or any other symbols in its name. In this case FLUID assigns a pointer to the widget to the name, but does not attempt to declare it. This can be used to get the widgets into structures. An unnamed widget has a blank name and no pointer is stored.
Widgets may either call a named callback function that you write in another source file, or you can supply a small piece of C++ source and FLUID will write a private callback function into the .cxx file.
Running FLUID Under UNIX
To run FLUID under UNIX, type:
to edit the .fl file filename.fl. If the file does not exist you will get an error pop-up, but if you dismiss it you will be editing a blank file of that name. You can run FLUID without any name, in which case you will be editing an unnamed blank setup (but you can use save-as to write it to a file).
You can provide any of the standard FLTK switches before the filename:
Changing the colors may be useful to see what your interface will look at if the user calls it with the same switches. Similarly, using "-scheme plastic" will show how the interface will look using the "plastic" scheme.
In the current version, if you don't put FLUID into the background with '&' then you will be able to abort FLUID by typing CTRL-C on the terminal. It will exit immediately, losing any changes.
Running FLUID Under Microsoft Windows
To run FLUID under WIN32, double-click on the FLUID.exe file. You can also run FLUID from the Command Prompt window. FLUID always runs in the background under WIN32.
Compiling .fl files
FLUID can also be called as a command-line "compiler" to create the .cxx and .h file from a .fl file. To do this type:
This is the same as the menu 'File/Write Code...'. It will read the filename.fl file and write filename.cxx and filename.h. Any leading directory on filename.fl will be stripped, so they are always written to the current directory. If there are any errors reading or writing the files, FLUID will print the error and exit with a non-zero code. You can use the following lines in a makefile to automate the creation of the source and header files:
Most versions of make support rules that cause .fl files to be compiled:
If you use
FLUID will also write the "strings" for internationalization in file 'filename.txt' (menu: 'File/Write Strings...').
Finally there is another option which is useful for program developers who have many .fl files and want to upgrade them to the current FLUID version. FLUID will read the filename.fl file, save it, and exit immediately. This writes the file with current syntax and options and the current FLTK version in the header of the file. Use
to 'upgrade' filename.fl . You may combine this with '-c' or '-cs'.
- Note
- All these commands overwrite existing files w/o warning. You should particularly take care when running 'fluid -u' since this overwrites the original .fl source file.
A Short Tutorial
FLUID is an amazingly powerful little program. However, this power comes at a price as it is not always obvious how to accomplish seemingly simple tasks with it. This tutorial will show you how to generate a complete user interface class with FLUID that is used for the CubeView program provided with FLTK.
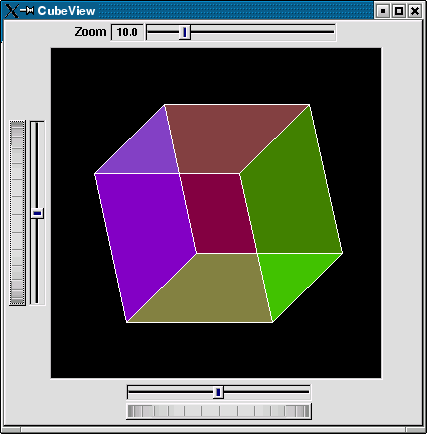
The window is of class CubeViewUI, and is completely generated by FLUID, including class member functions. The central display of the cube is a separate subclass of Fl_Gl_Window called CubeView. CubeViewUI manages CubeView using callbacks from the various sliders and rollers to manipulate the viewing angle and zoom of CubeView.
At the completion of this tutorial you will (hopefully) understand how to:
- Use FLUID to create a complete user interface class, including constructor and any member functions necessary.
- Use FLUID to set callbacks member functions of a custom widget classes.
- Subclass an Fl_Gl_Window to suit your purposes.
The CubeView Class
The CubeView class is a subclass of Fl_Gl_Window. It has methods for setting the zoom, the x and y pan, and the rotation angle about the x and y axes.
You can safely skip this section as long as you realize that CubeView is a sublass of Fl_Gl_Window and will respond to calls from CubeViewUI, generated by FLUID.
- The CubeView Class Definition
Here is the CubeView class definition, as given by its header file "test/CubeView.h":
- The CubeView Class Implementation
Here is the CubeView implementation. It is very similar to the "cube" demo included with FLTK.
The CubeViewUI Class
We will completely construct a window to display and control the CubeView defined in the previous section using FLUID.
- Defining the CubeViewUI Class
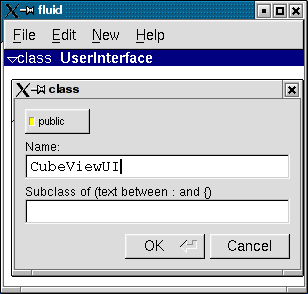
Once you have started FLUID, the first step in defining a class is to create a new class within FLUID using the New->Code->Class menu item. Name the class "CubeViewUI" and leave the subclass blank. We do not need any inheritance for this window. You should see the new class declaration in the FLUID browser window.
- Adding the Class Constructor
Click on the CubeViewUI class in the FLUID window and add a new method by selecting New->Code->Function/Method. The name of the function will also be CubeViewUI. FLUID will understand that this will be the constructor for the class and will generate the appropriate code. Make sure you declare the constructor public.
Then add a window to the CubeViewUI class. Highlight the name of the constructor in the FLUID browser window and click on New->Group->Window. In a similar manner add the following to the CubeViewUI constructor:
- A horizontal roller named
hrot - A vertical roller named
vrot - A horizontal slider named
xpan - A vertical slider named
ypan - A horizontal value slider named
zoom
None of these additions need be public. And they shouldn't be unless you plan to expose them as part of the interface for CubeViewUI.
When you are finished you should have something like this:
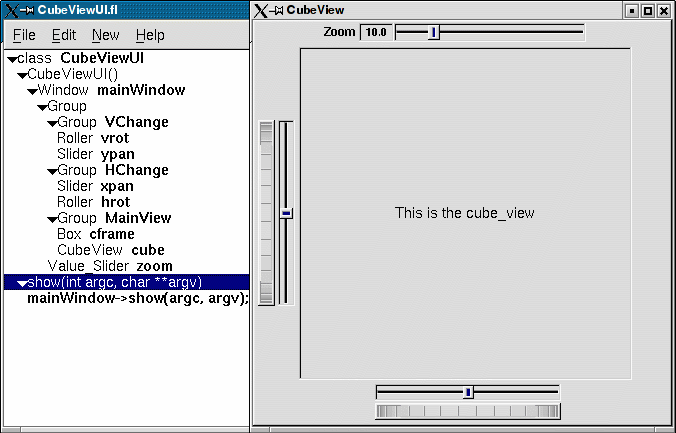
We will talk about the show() method that is highlighted shortly.
- Adding the CubeView Widget
What we have is nice, but does little to show our cube. We have already defined the CubeView class and we would like to show it within the CubeViewUI.
The CubeView class inherits the Fl_Gl_Window class, which is created in the same way as a Fl_Box widget. Use New->Other->Box to add a square box to the main window. This will be no ordinary box, however.
The Box properties window will appear. The key to letting CubeViewUI display CubeView is to enter CubeView in the Class: text entry box. This tells FLUID that it is not an Fl_Box, but a similar widget with the same constructor.
In the Extra Code: field enter #include "CubeView.h"
This #include is important, as we have just included CubeView as a member of CubeViewUI, so any public CubeView methods are now available to CubeViewUI.

- Defining the Callbacks
Each of the widgets we defined before adding CubeView can have callbacks that call CubeView methods. You can call an external function or put in a short amount of code in the Callback field of the widget panel. For example, the callback for the ypan slider is:
We call cube->redraw() after changing the value to update the CubeView window. CubeView could easily be modified to do this, but it is nice to keep this exposed. In the case where you may want to do more than one view change only redrawing once saves a lot of time.
There is no reason to wait until after you have added CubeView to enter these callbacks. FLUID assumes you are smart enough not to refer to members or functions that don't exist.
- Adding a Class Method
You can add class methods within FLUID that have nothing to do with the GUI. As an example add a show function so that CubeViewUI can actually appear on the screen.
Make sure the top level CubeViewUI is selected and select New->Code->Function/Method. Just use the name show(). We don't need a return value here, and since we will not be adding any widgets to this method FLUID will assign it a return type of void.

Once the new method has been added, highlight its name and select New->Code->Code. Enter the method's code in the code window.
Adding Constructor Initialization Code
If you need to add code to initialize a class, for example setting initial values of the horizontal and vertical angles in the CubeView, you can simply highlight the constructor and select New->Code->Code. Add any required code.
Generating the Code
Now that we have completely defined the CubeViewUI, we have to generate the code. There is one last trick to ensure this all works. Open the preferences dialog from Edit->Preferences.
At the bottom of the preferences dialog box is the key: "Include Header from Code". Select that option and set your desired file extensions and you are in business. You can include the CubeViewUI.h (or whatever extension you prefer) as you would any other C++ class.
FLUID Reference
The following sections describe each of the windows in FLUID.
The Widget Browser
The main window shows a menu bar and a scrolling browser of all the defined widgets. The name of the .fl file being edited is shown in the window title.
The widgets are stored in a hierarchy. You can open and close a level by clicking the "triangle" at the left of a widget. The leftmost widgets are the parents, and all the widgets listed below them are their children. Parents don't have to have any children.
The top level of the hierarchy is composed of functions and classes. Each of these will produce a single C++ public function or class in the output .cxx file. Calling the function or instantiating the class will create all of the child widgets.
The second level of the hierarchy contains the windows. Each of these produces an instance of class Fl_Window.
Below that are either widgets (subclasses of Fl_Widget) or groups of widgets (including other groups). Plain groups are for layout, navigation, and resize purposes. Tab groups provide the well-known file-card tab interface.
Widgets are shown in the browser by either their name (such as "main_panel" in the example), or by their type and label (such as "Button "the green"").
You select widgets by clicking on their names, which highlights them (you can also select widgets from any displayed window). You can select many widgets by dragging the mouse across them, or by using Shift+Click to toggle them on and off. To select no widgets, click in the blank area under the last widget. Note that hidden children may be selected even when there is no visual indication of this.
You open widgets by double-clicking on them, or (to open several widgets you have picked) by typing the F1 key. A control panel will appear so you can change the widget(s).
Menu Items
The menu bar at the top is duplicated as a pop-up menu on any displayed window. The shortcuts for all the menu items work in any window. The menu items are:
- File/Open... (Ctrl+o)
- Discards the current editing session and reads in a different
.flfile. You are asked for confirmation if you have changed the current file.
- FLUID can also read
.fdfiles produced by the Forms and XForms "fdesign" programs. It is best to File/Merge them instead of opening them. FLUID does not understand everything in a.fdfile, and will print a warning message on the controlling terminal for all data it does not understand. You will probably need to edit the resulting setup to fix these errors. Be careful not to save the file without changing the name, as FLUID will write over the.fdfile with its own format, which fdesign cannot read!
- File/Insert... (Ctrl+i)
- Inserts the contents of another
.flfile, without changing the name of the current.flfile. All the functions (even if they have the same names as the current ones) are added, and you will have to use cut/paste to put the widgets where you want.
- File/Save (Ctrl+s)
- Writes the current data to the
.flfile. If the file is unnamed then FLUID will ask for a filename.
- File/Save As... (Ctrl+Shift+S)
- Asks for a new filename and saves the file.
- File/Write Code (Ctrl+Shift+C)
- "Compiles" the data into a
.cxxand.hfile. These are exactly the same as the files you get when you run FLUID with the-cswitch.
- The output file names are the same as the
.flfile, with the leading directory and trailing ".fl" stripped, and ".h" or ".cxx" appended.
- File/Write Strings (Ctrl+Shift+W)
- Writes a message file for all of the text labels defined in the current file.
- The output file name is the same as the
.flfile, with the leading directory and trailing ".fl" stripped, and ".txt", ".po", or ".msg" appended depending on the Internationalization Mode.
- File/Quit (Ctrl+q)
- Exits FLUID. You are asked for confirmation if you have changed the current file.
- Edit/Undo (Ctrl+z)
- This isn't implemented yet. You should do save often so you can recover from any mistakes you make.
- Edit/Cut (Ctrl+x)
- Deletes the selected widgets and all of their children. These are saved to a "clipboard" file and can be pasted back into any FLUID window.
- Edit/Copy (Ctrl+c)
- Copies the selected widgets and all of their children to the "clipboard" file.
- Edit/Paste (Ctrl+c)
- Pastes the widgets from the clipboard file.
- If the widget is a window, it is added to whatever function is selected, or contained in the current selection.
- If the widget is a normal widget, it is added to whatever window or group is selected. If none is, it is added to the window or group that is the parent of the current selection.
- To avoid confusion, it is best to select exactly one widget before doing a paste.
- Cut/paste is the only way to change the parent of a widget.
- Edit/Select All (Ctrl+a)
- Selects all widgets in the same group as the current selection.
- If they are all selected already then this selects all widgets in that group's parent. Repeatedly typing Ctrl+a will select larger and larger groups of widgets until everything is selected.
- Edit/Open... (F1 or double click)
- Displays the current widget in the attributes panel. If the widget is a window and it is not visible then the window is shown instead.
- Edit/Sort
- Sorts the selected widgets into left to right, top to bottom order. You need to do this to make navigation keys in FLTK work correctly. You may then fine-tune the sorting with "Earlier" and "Later". This does not affect the positions of windows or functions.
- Edit/Earlier (F2)
- Moves all of the selected widgets one earlier in order among the children of their parent (if possible). This will affect navigation order, and if the widgets overlap it will affect how they draw, as the later widget is drawn on top of the earlier one. You can also use this to reorder functions, classes, and windows within functions.
- Edit/Later (F3)
- Moves all of the selected widgets one later in order among the children of their parent (if possible).
- Edit/Group (F7)
- Creates a new Fl_Group and make all the currently selected widgets children of it.
- Edit/Ungroup (F8)
- Deletes the parent group if all the children of a group are selected.
- Edit/Overlays on/off (Ctrl+Shift+O)
- Toggles the display of the red overlays off, without changing the selection. This makes it easier to see box borders and how the layout looks. The overlays will be forced back on if you change the selection.
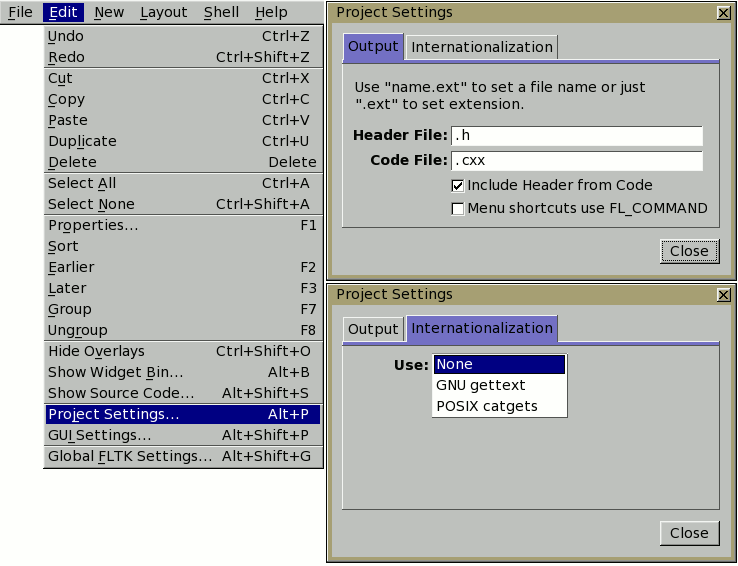
- Edit/Project Settings... (Alt+p)
- Displays the project settings panel.
- Under the "Output" tab you control the extensions or names of the files that are generated by FLUID. If you check the "Include Header from Code" button the code file will include the header file automatically.
- Under the "Internationalization" tab are the internationalization options, described later in this chapter.
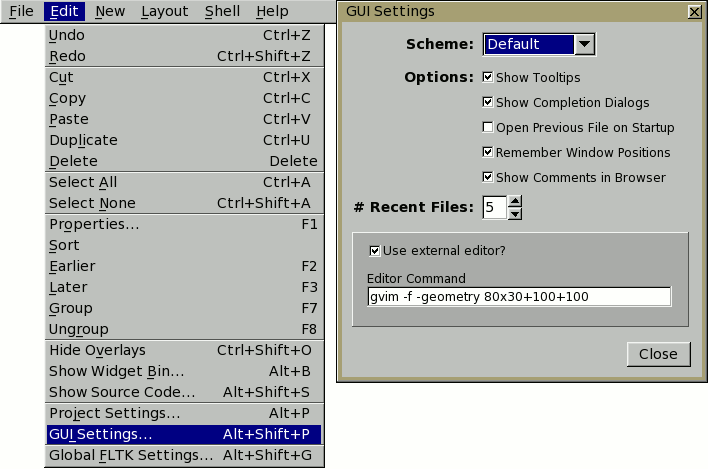
- Edit/GUI Settings... (Shift+Alt+p)
- Displays the GUI Settings panel, used to control the user interface settings.
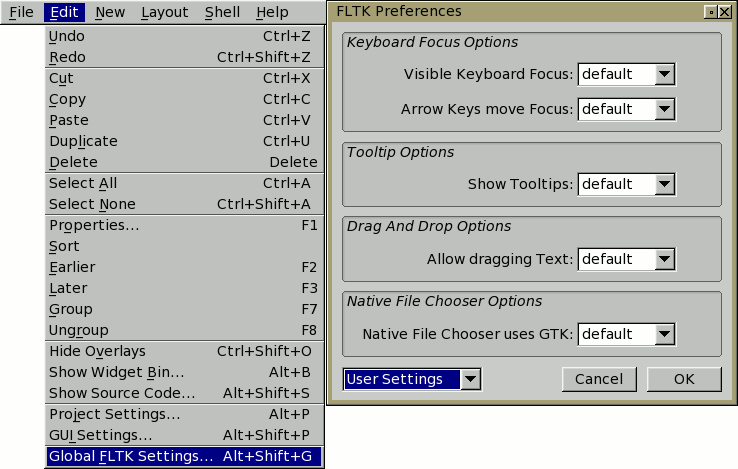
- Edit/Global FLTK Settings... (Shift+Alt+g)
- Displays the FLTK Global Settings ("Preferences") panel, used to control fluid's user specific and/or system wide settings.
- Tooltips provide descriptions of each option.
- At the lower-right, "User Settings" causes changes to only affect the current user, "System Settings" causes changes to be applied to all users on the current machine.
- New/Code/Function
- Creates a new C function. You will be asked for a name for the function. This name should be a legal C++ function template, without the return type. You can pass arguments which can be referred to by code you type into the individual widgets.
- If the function contains any unnamed windows, it will be declared as returning a Fl_Window pointer. The unnamed window will be returned from it (more than one unnamed window is useless). If the function contains only named windows, it will be declared as returning nothing (
void).
- It is possible to make the
.cxxoutput be a self-contained program that can be compiled and executed. This is done by deleting the function name somain(argc,argv)is used. The function will callshow()on all the windows it creates and then callFl::run(). This can also be used to test resize behavior or other parts of the user interface.
- You can change the function name by double-clicking on the function.
- New/Window
- Creates a new Fl_Window widget. The window is added to the currently selected function, or to the function containing the currently selected item. The window will appear, sized to 100x100. You can resize it to whatever size you require.
- The widget panel will also appear and is described later in this chapter.
- New/...
- All other items on the New menu are subclasses of Fl_Widget. Creating them will add them to the currently selected group or window, or the group or window containing the currently selected widget. The initial dimensions and position are chosen by copying the current widget, if possible.
- When you create the widget you will get the widget's control panel, which is described later in this chapter.
- Layout/Align/...
- Align all selected widgets to the first widget in the selection.
- Layout/Space Evenly/...
- Space all selected widgets evenly inside the selected space. Widgets will be sorted from first to last.
- Layout/Make Same Size/...
- Make all selected widgets the same size as the first selected widget.
- Layout/Center in Group/...
- Center all selected widgets relative to their parent widget
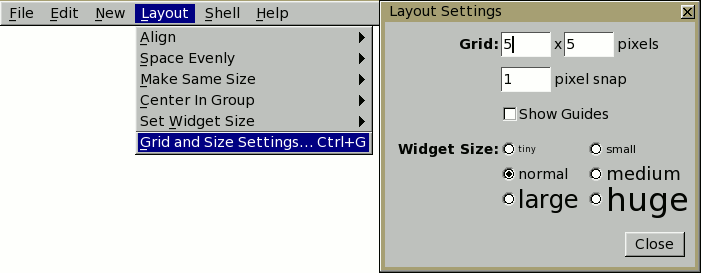
- Layout/Grid and Size Settings... (Ctrl+g)
- Displays the grid settings panel.
- This panel controls the grid that all widgets snap to when you move and resize them, and for the "snap" which is how far a widget has to be dragged from its original position to actually change.
- Shell/Execute Command... (Alt+x)
- Displays the shell command panel. The shell command is commonly used to run a 'make' script to compile the FLTK output.
- Shell/Execute Again (Alt+g)
- Run the shell command again.
- Help/About FLUID
- Pops up a panel showing the version of FLUID.
- Help/On FLUID
- Shows this chapter of the manual.
- Help/Manual
- Shows the contents page of the manual
The Widget Panel
When you double-click on a widget or a set of widgets you will get the "widget attribute panel".
When you change attributes using this panel, the changes are reflected immediately in the window. It is useful to hit the "no overlay" button (or type Ctrl+Shift+O) to hide the red overlay so you can see the widgets more accurately, especially when setting the box type.
If you have several widgets selected, they may have different values for the fields. In this case the value for one of the widgets is shown. But if you change this value, all of the selected widgets are changed to the new value.
Hitting "OK" makes the changes permanent. Selecting a different widget also makes the changes permanent. FLUID checks for simple syntax errors such as mismatched parenthesis in any code before saving any text.
"Revert" or "Cancel" put everything back to when you last brought up the panel or hit OK. However in the current version of FLUID, changes to "visible" attributes (such as the color, label, box) are not undone by revert or cancel. Changes to code like the callbacks are undone, however.
GUI Attributes
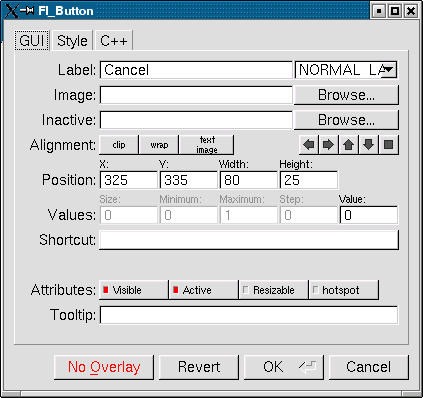
- Label (text field)
- String to print next to or inside the button. You can put newlines into the string to make multiple lines. The easiest way is by typing Ctrl+j.
- Symbols can be added to the label using the at sign ("@").
- Label (pull down menu)
- How to draw the label. Normal, shadowed, engraved, and embossed change the appearance of the text.
- Image
- The active image for the widget. Click on the Browse... button to pick an image file using the file chooser.
- Inactive
- The inactive image for the widget. Click on the Browse... button to pick an image file using the file chooser.
- Alignment (buttons)
- Where to draw the label. The arrows put it on that side of the widget, you can combine them to put it in the corner. The "box" button puts the label inside the widget, rather than outside.
- The clip button clips the label to the widget box, the wrap button wraps any text in the label, and the text image button puts the text over the image instead of under the image.
- Position (text fields)
- The position fields show the current position and size of the widget box. Enter new values to move and/or resize a widget.
- Values (text fields)
- The values and limits of the current widget. Depending on the type of widget, some or all of these fields may be inactive.
- Shortcut
- The shortcut key to activate the widget. Click on the shortcut button and press any key sequence to set the shortcut.
- Attributes (buttons)
- The Visible button controls whether the widget is visible (on) or hidden (off) initially. Don't change this for windows or for the immediate children of a Tabs group.
- The Active button controls whether the widget is activated (on) or deactivated (off) initially. Most widgets appear greyed out when deactivated.
- The Resizable button controls whether the window is resizeable. In addition all the size changes of a window or group will go "into" the resizable child. If you have a large data display surrounded by buttons, you probably want that data area to be resizable. You can get more complex behavior by making invisible boxes the resizable widget, or by using hierarchies of groups. Unfortunately the only way to test it is to compile the program. Resizing the FLUID window is not the same as what will happen in the user program.
- The Hotspot button causes the parent window to be positioned with that widget centered on the mouse. This position is determined when the FLUID function is called, so you should call it immediately before showing the window. If you want the window to hide and then reappear at a new position, you should have your program set the hotspot itself just before
show().
- The Border button turns the window manager border on or off. On most window managers you will have to close the window and reopen it to see the effect.
- X Class (text field)
- The string typed into here is passed to the X window manager as the class. This can change the icon or window decorations. On most (all?) window managers you will have to close the window and reopen it to see the effect.
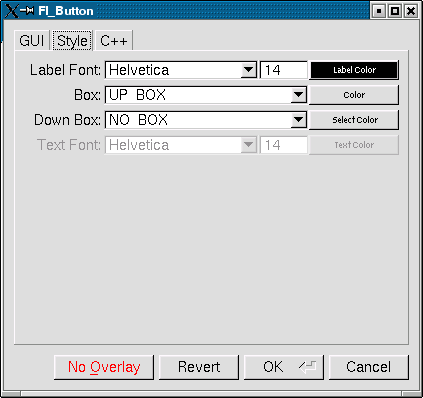
Style Attributes
- Label Font (pulldown menu)
- Font to draw the label in. Ignored by symbols, bitmaps, and pixmaps. Your program can change the actual font used by these "slots" in case you want some font other than the 16 provided.
- Label Size (pulldown menu)
- Pixel size (height) for the font to draw the label in. Ignored by symbols, bitmaps, and pixmaps. To see the result without dismissing the panel, type the new number and then Tab.
- Label Color (button)
- Color to draw the label. Ignored by pixmaps (bitmaps, however, do use this color as the foreground color).
- Box (pulldown menu)
- The boxtype to draw as a background for the widget.
- Many widgets will work, and draw faster, with a "frame" instead of a "box". A frame does not draw the colored interior, leaving whatever was already there visible. Be careful, as FLUID may draw this ok but the real program may leave unwanted stuff inside the widget.
- If a window is filled with child widgets, you can speed up redrawing by changing the window's box type to "NO_BOX". FLUID will display a checkerboard for any areas that are not colored in by boxes. Note that this checkerboard is not drawn by the resulting program. Instead random garbage will be displayed.
- Down Box (pulldown menu)
- The boxtype to draw when a button is pressed or for some parts of other widgets like scrollbars and valuators.
- Color (button)
- The color to draw the box with.
- Select Color (button)
- Some widgets will use this color for certain parts. FLUID does not always show the result of this: this is the color buttons draw in when pushed down, and the color of input fields when they have the focus.
- Text Font, Size, and Color
- Some widgets display text, such as input fields, pull-down menus, and browsers.
C++ Attributes
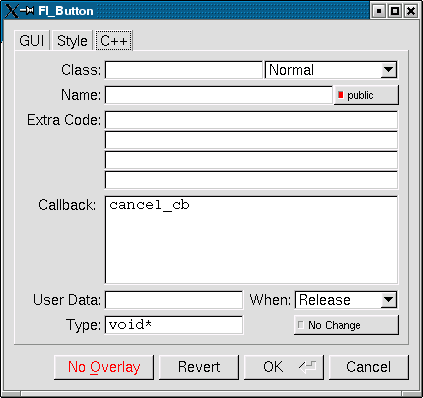
- Class
- This is how you use your own subclasses of Fl_Widget. Whatever identifier you type in here will be the class that is instantiated.
- In addition, no
#includeheader file is put in the.hfile. You must provide a#includeline as the first line of the "Extra Code" which declares your subclass.
- The class must be similar to the class you are spoofing. It does not have to be a subclass. It is sometimes useful to change this to another FLTK class. Currently the only way to get a double-buffered window is to change this field for the window to "Fl_Double_Window" and to add to the extra code.#include <FL/Fl_Double_Window.h>
- Type (upper-right pulldown menu)
- Some classes have subtypes that modify their appearance or behavior. You pick the subtype off of this menu.
- Name (text field)
- Name of a variable to declare, and to store a pointer to this widget into. This variable will be of type "<class>*". If the name is blank then no variable is created.
- You can name several widgets with "name[0]", "name[1]", "name[2]", etc. This will cause FLUID to declare an array of pointers. The array is big enough that the highest number found can be stored. All widgets in the array must be the same type.
- Public (button)
- Controls whether the widget is publicly accessible. When embedding widgets in a C++ class, this controls whether the widget is
publicorprivatein the class. Otherwise it controls whether the widget is declaredstaticor global (extern).
- Extra Code (text fields)
- These four fields let you type in literal lines of code to dump into the
.hor.cxxfiles.
- If the text starts with a
#or the wordexternthen FLUID thinks this is an "include" line, and it is written to the.hfile. If the same include line occurs several times then only one copy is written.
- All other lines are "code" lines. The current widget is pointed to by the local variable
o. The window being constructed is pointed to by the local variablew. You can also access any arguments passed to the function here, and any named widgets that are before this one.
- FLUID will check for matching parenthesis, braces, and quotes, but does not do much other error checking. Be careful here, as it may be hard to figure out what widget is producing an error in the compiler. If you need more than four lines you probably should call a function in your own
.cxxcode.
- Callback (text field)
- This can either be the name of a function, or a small snippet of code. If you enter anything other than letters, numbers, and the underscore then FLUID treats it as code.
- A name refers to a function in your own code. It must be declared as '
void name(<class> *, void *)'.
- A code snippet is inserted into a static function in the
.cxxoutput file. The function prototype isvoid name(class *o, void *v)so that you can refer to the widget asoand theuser_data()asv. FLUID will check for matching parenthesis, braces, and quotes, but does not do much other error checking. Be careful here, as it may be hard to figure out what widget is producing an error in the compiler.
- If the callback is blank then no callback is set.
- User Data (text field)
- This is a value for the
user_data()of the widget. If blank the default value of zero is used. This can be any piece of C code that can be cast to avoidpointer.
- Type (text field)
- The
void*in the callback function prototypes is replaced with this. You may want to uselongfor old XForms code. Be warned that anything other thanvoid*is not guaranteed to work! However on most architectures other pointer types are ok, andlongis usually ok, too.
- When (pulldown menu)
- When to do the callback. This can be Never, Changed, Release, or Enter Key. The value of Enter Key is only useful for text input fields.
- There are other rare but useful values for the
when()field that are not in the menu. You should use the extra code fields to put these values in.
- No Change (button)
- The No Change button means the callback is done on the matching event even if the data is not changed.
Selecting and Moving Widgets
Double-clicking a window name in the browser will display it, if not displayed yet. From this display you can select widgets, sets of widgets, and move or resize them. To close a window either double-click it or type ESC.
To select a widget, click it. To select several widgets drag a rectangle around them. Holding down shift will toggle the selection of the widgets instead.
You cannot pick hidden widgets. You also cannot choose some widgets if they are completely overlapped by later widgets. Use the browser to select these widgets.
The selected widgets are shown with a red "overlay" line around them. You can move the widgets by dragging this box. Or you can resize them by dragging the outer edges and corners. Hold down the Alt key while dragging the mouse to defeat the snap-to-grid effect for fine positioning.
If there is a tab box displayed you can change which child is visible by clicking on the file tabs. The child you pick is selected.
The arrow, tab, and shift+tab keys "navigate" the selection. Left, right, tab, or shift+tab move to the next or previous widgets in the hierarchy. Hit the right arrow enough and you will select every widget in the window. Up/down widgets move to the previous/next widgets that overlap horizontally. If the navigation does not seem to work you probably need to "Sort" the widgets. This is important if you have input fields, as FLTK uses the same rules when using arrow keys to move between input fields.
To "open" a widget, double click it. To open several widgets select them and then type F1 or pick "Edit/Open" off the pop-up menu.
Type Ctrl+o to temporarily toggle the overlay off without changing the selection, so you can see the widget borders.
You can resize the window by using the window manager border controls. FLTK will attempt to round the window size to the nearest multiple of the grid size and makes it big enough to contain all the widgets (it does this using illegal X methods, so it is possible it will barf with some window managers!). Notice that the actual window in your program may not be resizable, and if it is, the effect on child widgets may be different.
The panel for the window (which you get by double-clicking it) is almost identical to the panel for any other Fl_Widget. There are three extra items:
Image Labels
The contents of the image files in the Image and Inactive text fields are written to the .cxx file. If many widgets share the same image then only one copy is written. Since the image data is embedded in the generated source code, you need only distribute the C++ code and not the image files themselves.
However, the filenames are stored in the .fl file so you will need the image files as well to read the .fl file. Filenames are relative to the location of the .fl file and not necessarily the current directory. We recommend you either put the images in the same directory as the .fl file, or use absolute path names.
- Notes for All Image Types
- FLUID runs using the default visual of your X server. This may be 8 bits, which will give you dithered images. You may get better results in your actual program by adding the code "Fl::visual(FL_RGB)" to your code right before the first window is displayed.
- All widgets with the same image on them share the same code and source X pixmap. Thus once you have put an image on a widget, it is nearly free to put the same image on many other widgets.
- If you edit an image at the same time you are using it in FLUID, the only way to convince FLUID to read the image file again is to remove the image from all widgets that are using it or re-load the
.flfile.
- Don't rely on how FLTK crops images that are outside the widget, as this may change in future versions! The cropping of inside labels will probably be unchanged.
- To more accurately place images, make a new "box" widget and put the image in that as the label.
- XBM (X Bitmap) Files
- FLUID reads X bitmap files which use C source code to define a bitmap. Sometimes they are stored with the ".h" or ".bm" extension rather than the standard ".xbm" extension.
- FLUID writes code to construct an Fl_Bitmap image and use it to label the widget. The '1' bits in the bitmap are drawn using the label color of the widget. You can change this color in the FLUID widget attributes panel. The '0' bits are transparent.
- The program "bitmap" on the X distribution does an adequate job of editing bitmaps.
- XPM (X Pixmap) Files
- FLUID reads X pixmap files as used by the
libxpmlibrary. These files use C source code to define a pixmap. The filenames usually have the ".xpm" extension.
- FLUID writes code to construct an Fl_Pixmap image and use it to label the widget. The label color of the widget is ignored, even for 2-color images that could be a bitmap. XPM files can mark a single color as being transparent, and FLTK uses this information to generate a transparency mask for the image.
- We have not found any good editors for small iconic pictures. For pixmaps we have used XPaint and the KDE icon editor.
- BMP Files
- FLUID reads Windows BMP image files which are often used in WIN32 applications for icons. FLUID converts BMP files into (modified) XPM format and uses a Fl_BMP_Image image to label the widget. Transparency is handled the same as for XPM files. All image data is uncompressed when written to the source file, so the code may be much bigger than the
.bmpfile.
- GIF Files
- FLUID reads GIF image files which are often used in HTML documents to make icons. FLUID converts GIF files into (modified) XPM format and uses a Fl_GIF_Image image to label the widget. Transparency is handled the same as for XPM files. All image data is uncompressed when written to the source file, so the code may be much bigger than the
.giffile. Only the first image of an animated GIF file is used.
- JPEG Files
- If FLTK is compiled with JPEG support, FLUID can read JPEG image files which are often used for digital photos. FLUID uses a Fl_JPEG_Image image to label the widget, and writes uncompressed RGB or grayscale data to the source file.
- PNG (Portable Network Graphics) Files
- If FLTK is compiled with PNG support, FLUID can read PNG image files which are often used in HTML documents. FLUID uses a Fl_PNG_Image image to label the widget, and writes uncompressed RGB or grayscale data to the source file. PNG images can provide a full alpha channel for partial transparency, and FLTK supports this as best as possible on each platform.
Internationalization with FLUID
FLUID supports internationalization (I18N for short) of label strings used by widgets. The preferences window (Ctrl+p) provides access to the I18N options.
I18N Methods
FLUID supports three methods of I18N: use none, use GNU gettext, and use POSIX catgets. The "use none" method is the default and just passes the label strings as-is to the widget constructors.
The "GNU gettext" method uses GNU gettext (or a similar text-based I18N library) to retrieve a localized string before calling the widget constructor.
The "POSIX catgets" method uses the POSIX catgets function to retrieve a numbered message from a message catalog before calling the widget constructor.
Using GNU gettext for I18N
FLUID's code support for GNU gettext is limited to calling a function or macro to retrieve the localized label; you still need to call setlocale() and textdomain() or bindtextdomain() to select the appropriate language and message file.
To use GNU gettext for I18N, open the preferences window and choose "GNU gettext" from the Use: chooser. Two new input fields will then appear to control the include file and function/macro name to use when retrieving the localized label strings.
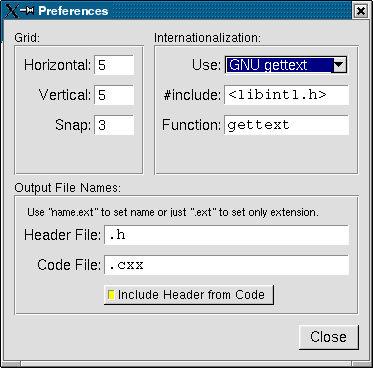
The #include field controls the header file to include for I18N; by default this is <libintl.h>, the standard I18N file for GNU gettext.
The Function: field controls the function (or macro) that will retrieve the localized message; by default the gettext function will be called.
Using POSIX catgets for I18N
FLUID's code support for POSIX catgets allows you to use a global message file for all interfaces or a file specific to each .fl file; you still need to call setlocale() to select the appropriate language.
To use POSIX catgets for I18N, open the preferences window and choose "POSIX catgets" from the Use: chooser. Three new input fields will then appear to control the include file, catalog file, and set number for retrieving the localized label strings.
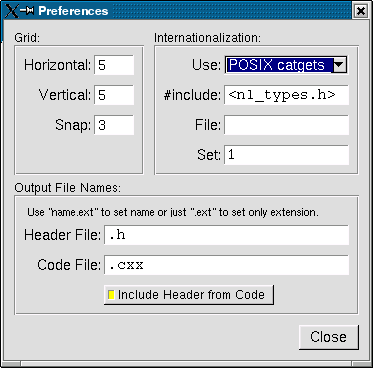
The #include field controls the header file to include for I18N; by default this is <nl_types.h>, the standard I18N file for POSIX catgets.
The File: field controls the name of the catalog file variable to use when retrieving localized messages; by default the file field is empty which forces a local (static) catalog file to be used for all of the windows defined in your .fl file.
The Set: field controls the set number in the catalog file. The default set is 1 and rarely needs to be changed.
Known limitations
Declaration Blocks can be used to temporarily block out already designed code using #if 0 and #endif type construction. This will effectively avoid compilation of blocks of code. However, static code and data generated by this segment (menu items, images, include statements, etc.) will still be generated and likely cause compile-time warnings.
| [Prev] Using OpenGL | [Index] | Advanced FLTK [Next] |